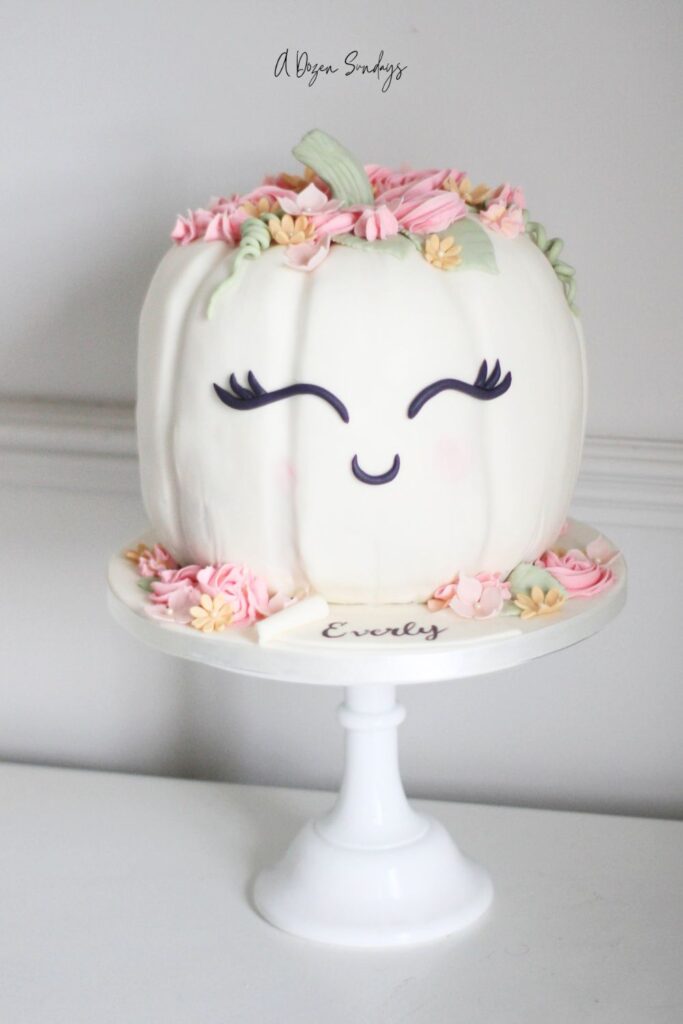
Pretty Pumpkin Halloween Cake
Halloween doesn’t have to be scary! This cake is ideal for a cute pastel Halloween Party or if you have a Halloween birthday cake to make. Use your favourite cake flavour, carve to shape and then decorate with the prettiest flowers and cutest face. The best thing about this cake? It doesn’t have to be perfect! Here’s how to make this pretty pumpkin Halloween cake.
Why You’ll Love This Tutorial:
- It’s Halloween… but make it cute – No ghosts or gore here. Just a soft, smiley pumpkin topped with pretty pastel blooms.
- Perfect for beginners – You don’t need pro cake skills. If you can roll fondant and stack cake layers, you’re good to go.
- Totally customisable – Switch up the colours, make it chocolate inside, or add a name tag like I did. It’s your pumpkin!
- Ideal for all ages – Kids love the friendly face, and adults can’t resist how chic it looks on a cake stand.
- A real party showstopper – Whether it’s for a birthday, Halloween, or just a seasonal treat, this cake steals the show.
Psst…see those links? They’re Amazon affiliate links! If you click them and purchase something, I may get a tiny commission (enough for a cuppa, maybe? ☕️) at no cost to you. I only recommend products I genuinely love, so you’re in good hands!
What You’ll Need to Make This Pumpkin Halloween Cake
For the Cake:
- 2 x 6-inch round cake tins (deep)
- Your favourite vanilla sponge or pumpkin spice cake recipe (enough for 4 layers)
- Buttercream (vanilla or cream cheese) for filling
- Buttercream or ganache for crumb-coating
For Decoration:
- 1.5kg white fondant (for covering the cake)
- 50g black fondant (for the eyes and smile)
- Pink petal dust or edible pink colouring (for cheeks)
- 50-110g fondant in pastel pink, peach, yellow, green, and lilac (for flowers, leaves and pumpkin stem)
- Edible glue or water for sticking details
- Icing sugar in a small shaker
- A small paintbrush
- Flower cutters or small plunger cutters. I used a blossom cutter, hydrangea cutter and a hydrangea leaf cutter.
- Cake board and cake stand
- Optional: Tylose powder
- Optional: edible pearls for the flower centres
Step 1: Bake the Cakes
- Bake 4 layers of 6-inch round cake using your chosen recipe.
- Once baked and cooled, level the tops so they’re flat.
- Chill the cakes in the fridge for easier stacking and shaping.
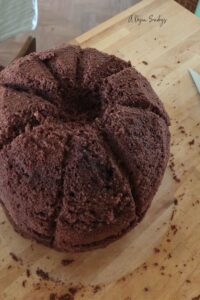
Step 2: Stack and Carve the Pumpkin Shape
- Stack the 4 layers with buttercream between each layer.
- Use a serrated knife to gently carve the stacked cake into a rounded pumpkin shape—slightly domed at the top and tapering at the base.
- Carve shallow vertical grooves around the cake to mimic the pumpkin’s ridges.
Step 3: Crumb Coat and Chill
- Cover the entire cake with a thin layer of buttercream or ganache to seal in the crumbs.
- Chill for 30 minutes to firm up.
Step 4: Cover with White Fondant
- Wet the cake slightly – run your hands under the tap and then run them over the cake to allow the sugarpaste to stick to the crumb coat.
- Roll out white sugarpaste large enough to cover the entire cake.
- Drape it gently over the cake and smooth it down with your hands or fondant smoothers, paying attention to the pumpkin grooves.
- Trim away any excess fondant at the base.
Step 5: Add the Face
- Roll out black fondant and cut out two curved eyelash shapes and a small smiling mouth. Use a small knife to cut to size. Make two of everything, so you know they’re going to be symmetrical.
- Attach the face to the front of the cake using edible glue or a dab of water.
- Dust on a little pink petal dust for blush cheeks.
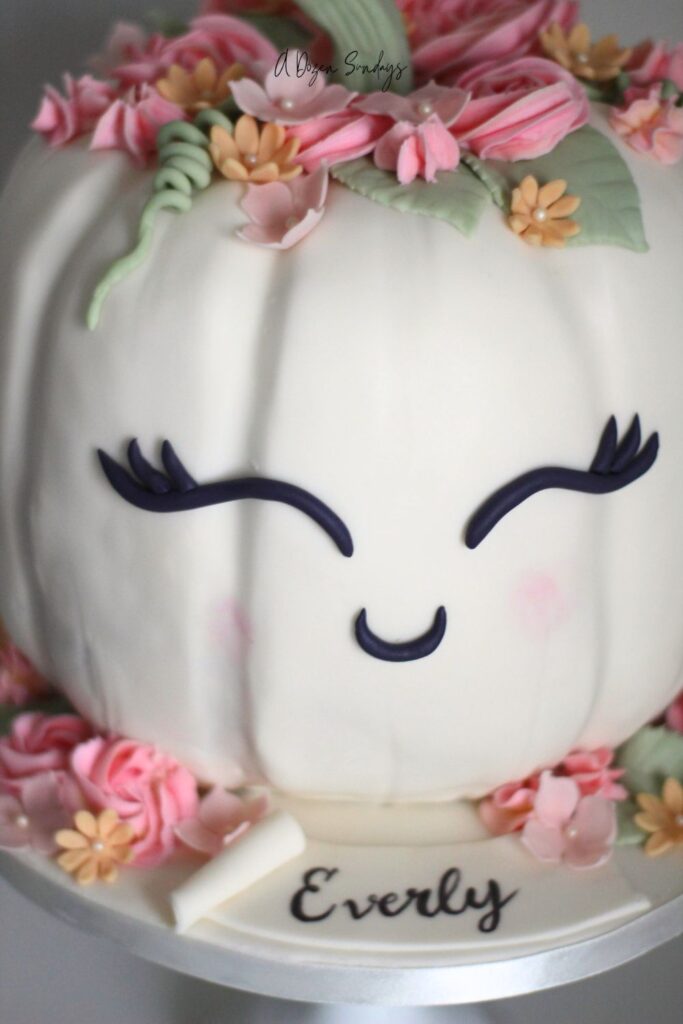
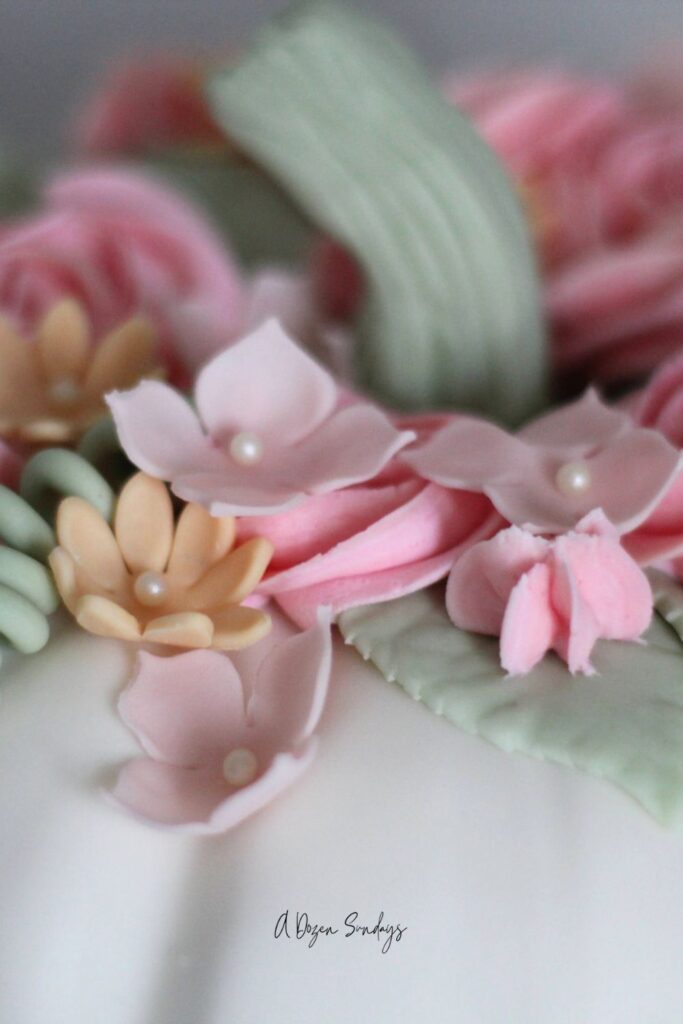
Step 6: Make the Fondant Flowers and Leaves
- Use pastel fondant and small cutters to create a variety of flowers.
- Add some simple leaves using green fondant – roll into a sausage shape and flatten, then indent with a tool or knife to create veins. You could also use a hydrangea leaf veiner, as I did, but you don’t need to.
- If you’d like a vine, roll out a thin coil of green fondant and curl it slightly before attaching.
- You can add edible pearls to the flower centres – stick them in place with some water.
Step 7: Assemble the Decorations
- Attach flowers and leaves around the top of the pumpkin using edible glue or a little water.
- Place a fondant stem in the center top (you can build this from a shaped piece of green fondant).
- Add a few flowers and leaves around the base of the cake for balance.
- Pipe some buttercream swirls to give the impression of more flowers.
Step 8: Finishing Touches
- Place the pumpkin Halloween cake on a cake board and add a name or message if you’d like.
- Display on a pretty stand and get ready for compliments!

Cute Pumpkin Halloween Cake
Instructions
Bake the Cakes
- Bake 4 layers of 6-inch round cake using your chosen recipe.
- Once baked and cooled, level the tops so they’re flat.
- Chill the cakes in the fridge for easier stacking and shaping.
Stack and Carve the Pumpkin Shape
- Stack the 4 layers with buttercream between each layer.
- Use a serrated knife to gently carve the stacked cake into a rounded pumpkin shape – slightly domed at the top and tapering at the base.

- Carve shallow vertical grooves around the cake to mimic the pumpkin's ridges. These don't have to be perfect.

Crumb Coat and Chill
- Cover the entire cake with a thin layer of buttercream to seal in the crumbs.
- Chill for 30 minutes to firm up.
Cover with White Fondant/Sugarpaste
- Roll out white fondant large enough to cover the entire cake.
- Drape it gently over the cake and smooth it down with your hands or fondant smoothers, paying attention to the pumpkin grooves.
- Trim away any excess fondant at the base.
Add the Face
- Roll out black fondant and cut out two curved eyelash shapes and a small smiling mouth. Use a small knife or templates if needed.
- Attach the face to the front of the cake using edible glue or a dab of water.
- Dust on a little pink petal dust for blush cheeks.
Make the Fondant Flowers and Leaves
- Use the pastel fondant and small cutters to create a variety of flowers.
- Add some simple leaves using green fondant – roll into a sausage shape and flatten, then indent with a tool or knife to create veins.
- If you’d like a vine, roll out a thin coil of green fondant and curl it slightly before attaching.
Assemble the Decorations
- Attach flowers and leaves around the top of the pumpkin using edible glue.
- Place a fondant stem in the center top (you can build this from a shaped piece of green fondant).
- Add a few flowers and leaves around the base of the cake for balance.
Finishing Touches
- Place the cake on a cake board and add a name or message if you’d like.
- Display on a pretty stand and get ready for compliments!
Notes
I made this cake a few years ago when I used to bake for customers as White Rose Cake Design. Let me know if you have any questions!
For more Halloween bakes, check out: Halloween